|
|
|
|
|
|
|
|
|
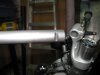
Diavel headlight film install
|

|
|
|
Installation of the Lamin-X tint (lightest tint, smoked) on our Ducati Diavel Strada. For our application I decided to NOT cover the LED parking/running light in order to accent/break-up the all-dark front end. For best results the headlight should be removed and this is to help that task. In the shop manual see section 6-4, Electric system and engine control system, 4-Lights and indicating devices, Renewal of the headlight. Note that a thread locking solution should be used to keep the fasteners secure. I used what I had, which was Loctite purple, to keep them secure but allow them to be removed without too much hassle if necessary however Ducati recommends using Loctit 243 (i.e., LOCK 2 from section 1-2, General.
24 files, last one added on Oct 03, 2014
Album viewed 836 times
|
|
|
|
| 28 albums on 4 page(s) |
|
3 |
|
 Last updated albums - Ducati Last updated albums - Ducati |

Motolectric HICAP SC1K449 viewsHere's everything that came in the kit -- WOW! Nicely stocked with everything one would need, including zip ties, nice large gloves, and various chemicals!Jul 25, 2016
|
|

Diavel low-beam HID729 viewsHID on the left, OEM H7 on the right. Notice that the HID bulb is taller.Oct 03, 2014
|
|
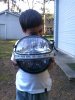
Diavel headlight film install836 viewsMy little helper showing the bottom tinted and the top untinted.Oct 03, 2014
|
|

Diavel LED turn signals392 viewsSize comparison of the incandescent (left) bulb vs. the LED unit (right). Though the LED unit is taller it will still fit inside the signal housing with room to spare.Aug 02, 2014
|
|

Dry clutch change738 views...to mate with the notch in the one clutch spring post. I seriously don't think it matters but I tried to follow the workshop manual instructions as closely as I could, just in case.Aug 05, 2013
|
|

Timing-belt change485 viewsFor the inner belt that runs the vertical (rear) cylinder I made my own mark on the belt and pulley at about the center spot.Jul 28, 2013
|
|

Ohlins rear suspension install532 viewsOEM Sachs on top (black spring) and Ohlins racing on the bottom (yellow spring).Dec 27, 2012
|
|

PCIII-USB installed488 viewsThe PCIII-USB and the extensions completed, ready for installation!Apr 28, 2012
|
|