Type Three Tuning Page -- Gauges
Please select the area of interest:


Stock
Radio repair volks (TypeIII email list recommendations only):
"Elliott's Car Radio Repair at 610-435-6360. Bob Elliott is real fussy
and has an attitude that may piss some off. In other words he will repair your
radio right or you can it someplace else. Three weeks my radio was back in my
car and works perfectly. He only charges $75 plus parts w/warrantee and over
does it to protect your radio during shipping." ~Robert Burgess
--- or ---
Keith Park does repairs but only in the winter months. see
http://members.aol.com/radiorest/index.html. This is his radio site, he does
car radios as well but not as often.
After several decades of California sunshine and (ahem) kickin' tha phat jams
from the killer pushbutton Blaupunkt AM radio, my '71 squareback's original
under dash speaker was, well, toast. I managed to fish it out for a look-see,
which was no easy task. First thing to note: do NOT remove the dash board cover
All the action takes place underneath the dash. Here's what I had to do:
1) Remove the radio. Mine's bolted to the lip under the dash, right in the
center.
2) Remove the plastic fresh air hoses. They slip off at each end. Note location
and orientation of both of them before removal.
3) Remove ash tray.
4) Unscrew ash tray holder from front of dash, and remove holder.
5) Go fishing for the speaker. It's held on by a big, giant clip! You have to
feel around and unhook one end of the clip, swing the clip out of the way and
then the speaker will fall right out. Improvise.
6) I took the tattered speaker to my local Radio Shack and found one of very
similar dimensions. Bought it. (Maybe US$6-10, as I recall.)
7) Installation is the reverse of removal. Well, almost. The new speaker was the
slightest bit thicker and/or wider at just the wrong place, making spring clip
reinstallation quite difficult. Not impossible, just difficult. Use gentle
force.
Enjoy. Your favorite chanteuse will no longer sound like she needs a cough drop.
:-)
(Note that these are the specific steps for a 1971 Type III. There are certainly
going to be variations to the procedures for different model years, but the
general approach should be the same.)
-Greg
gregm@vwtype3.org
> My speedo makes a noise like a bunch of angry
> bees. It starts about 30 mph and is super annoying.
> Any idea if this is easily fixable?
It can be either the speedo cable or the speedometer itself. It can be hard to
tell the difference. If you disconnect the cable from the speedo head and it
still makes noise then the cable is obviously the problem, but if this stops the
noise it could be either since you have disturbed the cable and changed the load
on it.
There is an adjustment that should be made to the cable that almost no one knows
about that you should try: Make sure that your cable has the cotter pin or
circlip holding it to the grease cap under the LF hubcap, then slide under the
car and find where the cable exits the inside face of the steering knuckle. Grab
the cable firmly and pull it inboard, then push it outwards. It will slide with
difficulty through the rubber bushing in the knuckle. Once you have gotten it to
move, push it in, grab it with your thumbnail against the rubber bushing and
pull it out. Look at the space now between the bushing and your thumbnail so you
can see the total amount of "play" there is. Now push it half way back in. This
makes sure there is no stress on the cable in the installed position. This
adjustment MUST be done with the cable fully installed in the speedometer head.
> My odometer and trip meter have quit working on my 73 squareback. I
> drove it to work Tuesday and it showed to be 28 miles, 33 mile trip. Then
> this morning it just quit working altogether. The speedometer still works,
> though not sure how accurately. Any ideas?
There is a plastic gear that drives the odometer. Some times they pop out of
place, sometimes they loose a tooth, sometimes they break. After 27 years, it is
hard to say. I would suggest that you pull the speedometer, and take it apart
and look at it. They are not hard to take apart. Pull straight out on the trip
reset knob. It will come off. Gently pry the chrome trim and glass off. It just
basically snaps onto the housing. Remove the 2 screws from the back, and the
insides will come out.
Since you have a '73, You should have a black faced speedo, which is rare. But
the gears are the same with the older one. If you need a gear, find what you can
in the salvage yard, and use it for parts for your original speedo.
Good Luck
Russ Wolfe
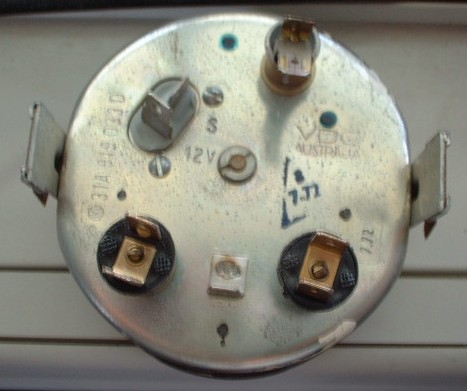
Australian gauges by Neil from the Type 3 email list:
VW Australia did indeed change out the gauges in the 1972 model with items of local manufacture. From what I've been able to gather, the government mandated that a certain percentage of the cars be locally made. VDO set up shop and manufactured the instruments in Australia. They all have a 31A part number, instead of 311.
All gauges: 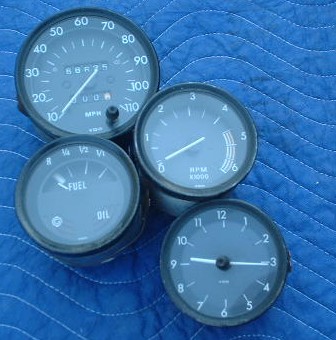
Speedometer: 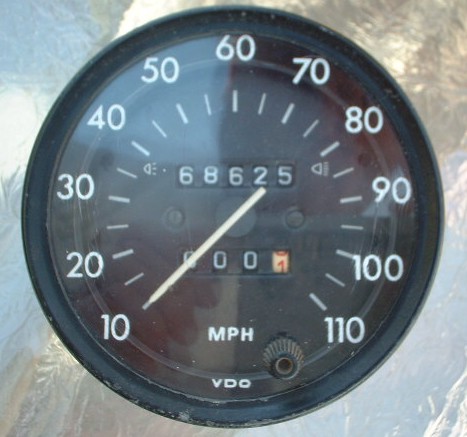
Fuel gauge: 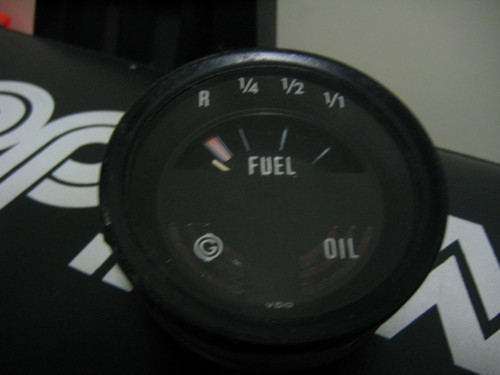
Clock: 
Custom
The fresh air vents can be used as a gauge holder for small gauges. This is what
I used for a brief time for my oil pressure gauge.
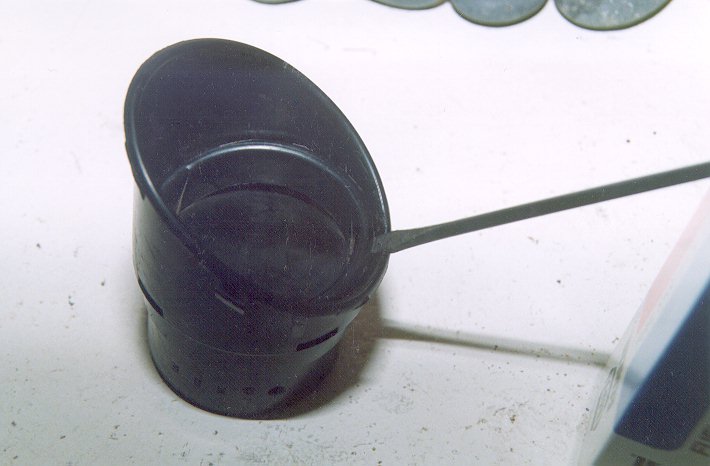
Carefully pry out some of the lip of the vent lid.

Carefully push in the locking tabs while pushing the vent lid through the angled
opening.
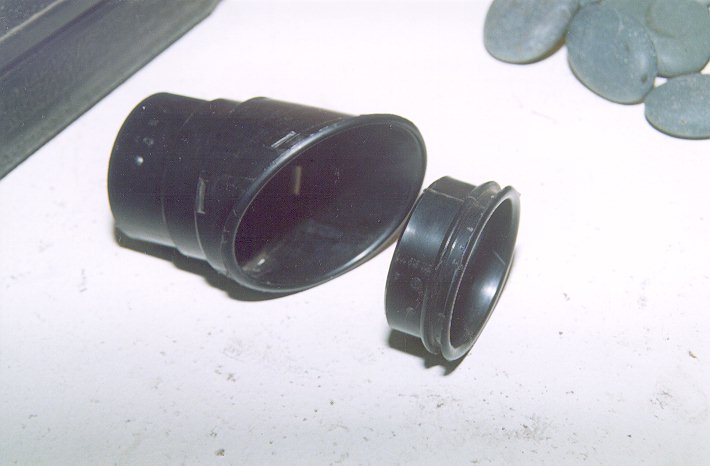
The vent lid pops out. The gauge can be pushed into the angled opening, then the
whole assembly pushed back into the dash. You may want to paint the bottom of
the gauge housing black or wrap it in black electrical tape so it matches the
vent and gauge face ring. It will be a snug fit and may take a little wiggling
to get it all to fit, but it does fit!
A custom job...
Here are the steps to change your Type III from 6 volts to 12 volts:
Change the cast aluminum fan housing and install the larger 12v generator. It is
possible to get a 12v generator the same size as a 6v, so that you do not have
to change the fan housing. Try Bill & Steves.
Change the coil.
Change the chokes.
Change the idle cut-off solenoids.
Change the flywheel. Use an automatic transmission starter so that you do not
have to change the starter shaft bushing. There was a flywheel hub design
change, as the older crank shaft end had a bulge. The flywheel has a step cut
into it to clear this bulge. It is probably easier to have a step machined into
the flywheel hub than to disassemble the engine to have the crank shaft end
dressed. Finding the correct flywheel is best. Finding the old style hub
flywheel with a removable ring gear (and the correct ring gear to go on it) is
next best, but harder. A 6v bendix gear in a 12v starter is rare, but I suppose
that you could disassemble a 6v starter, and have the gear welded and redrilled
for mounting in a 12v starter. Or don't change the flywheel and run your 6v
starter until it burns up.
(Or to avoid the whole scenario above just put a 12 volt solenoid onto
your 6 volt starter and leave the flywheel, bushing, clutch components, etc. as
is. I've done this MANY times with no problems yet.
Greg, Vintage Warehouse, Vintage VW Parts, Cars, and Accessories, 8134
Countryside Ct., Windsor, Ca. 95492, Phone 707.291.7606,
http://www.vintagewarehouse.com )
Change the voltage regulator.
Change the battery. Your battery cover will not fit anymore.
Change the windshield wiper motor. Or install a resistor to cut the voltage. Or
run your wipers
really fast until you burn them up.
Change the fuel gage in the dash. No need to change the sender in the tank.
Change the clock. Or don't worry about it because it won't run for ever anyway.
Do something with the radio.
Change the headlight relay.
Change the turn signal relay.
If you have a horn relay, change that. Change the horns.
Change every light bulb, everywhere.
That ought to about do it.
The easiest thing to do if your 6v electrical system is getting tired, is to put
a 6v horn relay (from a Karmann Ghia) in the solenoid circuit, so that your
solenoid can get a full 6 volts. You can do a similar trick in the coil circuit.
If you think your wiring is getting tired, try measuring the voltage at the
coil. When internal resistance drops the voltage to less than about 5.5 volts,
you will have trouble starting the car from weak spark. A similar test at the
solenoid will tell you that you will have trouble getting the starter to work
consistently. You can also replace the stock battery cable, which is about 4
gage (I think), with a heavier 0 gage cable to be certain that there is no
voltage loss going to the starter. If you change the positive battery cable, you
might also want to secure the starter ground, by putting a longer bolt through
the body where the battery is grounded now. Under the car, run a cable from the
longer bolt to one of the starter mounting bolts. This gives you a more direct
ground, again to avoid voltage drop at the starter. This 6v clean up stuff is a
lot easier than a 12v conversion, and lets you keep your car stock because no
body can see your modifications. Of course, a 12 volt system is not so subject
to tired harness disease, and lets you use a modern radio.
By Tim Dapper, tdapper@phoenixdsl.com